Grounding DINO for prompt driven object detection
Introduction
Grounding DINO is an open-set object detector using input prompt. A closed-set detector can name only the categories it was trained to output, such as the 80 classes in the COCO dataset. An open-set detector can look for objects described by a text prompt at inference time, even when those words were not a fixed output list of the model. The official implementation is the IDEA-Research/GroundingDINO repository (Liu et al., ECCV 2024). This note walks through the inference procedure in test.ipynb: load the pretrained Swin-T checkpoint, run detection on sample image with the prompt car. sea. tree. cloud, and draw the predicted boxes.
What the model receives and returns
Grounding DINO takes one image and one text string. The text is a caption that names the objects to find. The released Swin-T configuration sets num_queries = 900, so the model proposes 900 candidate boxes. Each box is paired with a vector of similarity scores over the text tokens. Two thresholds decide which proposals are kept:
-
box_thresholdkeeps a box when its highest token similarity is above this value. In the notebook this value is0.35. -
text_thresholdselects which words become the label of a kept box. A token is included in the phrase when its similarity is above this value. In the notebook this value is0.25.
Category names should be separated by a period. The prompt car. sea. tree. cloud asks for 4 categories, car. sea. tree. cloud, rather than one long phrase. The inference code lowercases the caption and appends a final period if one is missing, because the text encoder treats the period as a separator between categories.
The text encoder is BERT (bert-base-uncased), with a maximum text length of 256 tokens (max_text_len = 256 in GroundingDINO_SwinT_OGC.py). A single word can become more than one token, so the number of words in the prompt is not the number of text tokens.
Model used in the notebook
The notebook loads the smaller public checkpoint, GroundingDINO-T:
| Item | Value |
|---|---|
| Config | GroundingDINO_SwinT_OGC.py |
| Weights | groundingdino_swint_ogc.pth |
| Image backbone | Swin Transformer, tiny (swin_T_224_1k) |
| Text backbone | bert-base-uncased |
| Training data of this checkpoint | Objects365, GoldG, Cap4M |
| Reported COCO box AP | 48.4 zero-shot, 57.2 after fine-tuning |
The network has five main parts: an image backbone, a text backbone, a feature enhancer that mixes the two modalities, a language-guided query selection step, and a cross-modality decoder. The config uses 6 encoder layers and 6 decoder layers, a hidden size of 256, and 8 attention heads. The notebook does not train these weights. It only runs the checkpoint in evaluation mode.
Environment
Inference follows the install steps in the repository README. From the cloned project directory:
git clone https://github.com/IDEA-Research/GroundingDINO.git
cd GroundingDINO
pip install -r requirements.txt
mkdir -p weights
wget -q -O weights/groundingdino_swint_ogc.pth \
  https://github.com/IDEA-Research/GroundingDINO/releases/download/v0.1.0-alpha/groundingdino_swint_ogc.pth
The notebook calls the model with device='cuda', so a GPU with a working PyTorch CUDA build is assumed. CPU inference is available by passing device='cpu' to load_model and to predict.
The notebook expects three files in the working directory:
-
GroundingDINO_SwinT_OGC.py, the model config -
groundingdino_swint_ogc.pth, the checkpoint -
image1.png, the image to detect
In the upstream repository the same config lives at groundingdino/config/GroundingDINO_SwinT_OGC.py and the checkpoint is usually stored under weights/. The paths below match test.ipynb.
Step 1. Import the inference helpers
from groundingdino.util.inference import load_model, load_image, predict, annotate
These four functions cover the whole single-image pipeline:
-
load_modelbuilds the network from the config and copies in the checkpoint weights. -
load_imagereads the file and prepares the tensor the network expects. -
predictruns the forward pass and applies the two thresholds. -
annotatedraws boxes and labels on a copy of the original image.
Step 2. Load the checkpoint and set the detection request
model = load_model("./groundingdino/config/GroundingDINO_SwinT_OGC.py",
                   "./weights/groundingdino_swint_ogc.pth",
                   device='cuda')
IMAGE_PATH = "./image1.png"
TEXT_PROMPT = "car. sea. tree. cloud"
BOX_TRESHOLD = 0.35
TEXT_TRESHOLD = 0.25
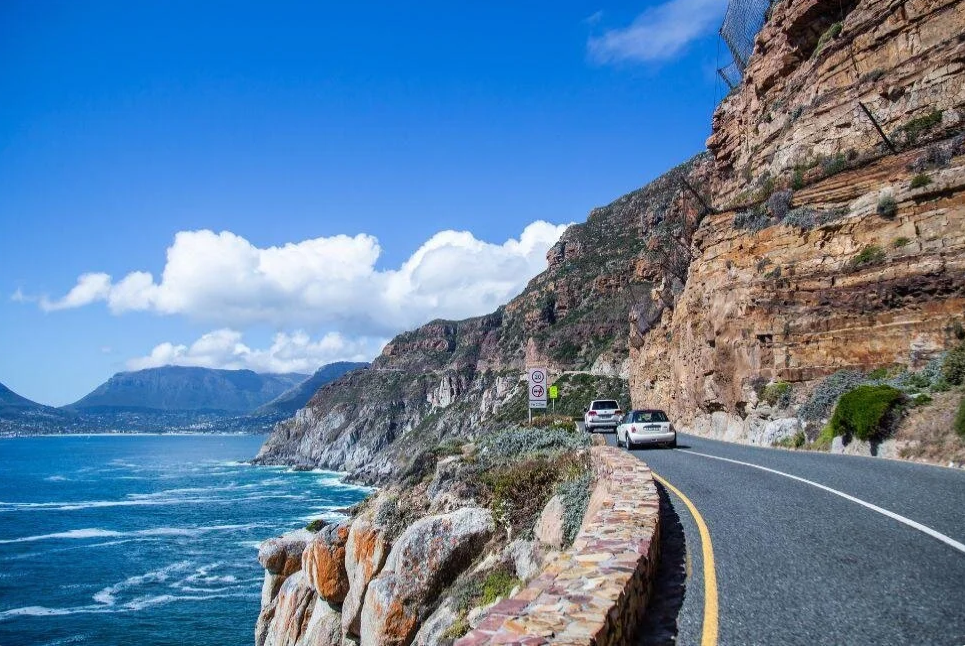
load_model reads the config with SLConfig, builds the Grounding DINO architecture, and loads the state dictionary from the .pth file onto CPU before the module is moved to the requested device.
TEXT_PROMPT is the open-set query. Changing the string changes which objects are searched for, without changing the weights. A prompt such as ship . boat . would ask for those categories on a maritime image. Keep each category short and separate categories with ..
BOX_TRESHOLD and TEXT_TRESHOLD are the notebook names for the box and text thresholds described above. Raising box_threshold drops weaker boxes. Raising text_threshold makes the attached phrase shorter and more selective.
Step 3. Prepare the image
image_source, image = load_image(IMAGE_PATH)
Step 4. Run detection
boxes, logits, phrases = predict(
    model=model,
    image=image,
    caption=TEXT_PROMPT,
    box_threshold=BOX_TRESHOLD,
    text_threshold=TEXT_TRESHOLD,
)
predict lowercases the caption, moves the model and the image tensor to CUDA, and runs a forward pass under torch.no_grad() so no gradients are stored.
The raw outputs are:
-
pred_logitswith shape(900, 256), the similarity of each box to each text token position. A sigmoid turns these values into scores in ((0, 1)). -
pred_boxeswith shape(900, 4), in normalized center format(cx, cy, w, h). Each coordinate is a fraction of the image width or height, so the values lie in ([0, 1]) before they are scaled back to pixels.
A box is kept when pred_logits.max(dim=1) > box_threshold. For each kept box, tokens whose score exceeds text_threshold are decoded back to a phrase with the BERT tokenizer. The function returns three aligned sequences:
-
boxes: the kept boxes, still in normalized(cx, cy, w, h) -
logits: the maximum token score of each kept box, used later as the printed confidence -
phrases: the text label of each kept box
Step 5. Draw the boxes
annotated_frame = annotate(
    image_source=image_source,
    boxes=boxes,
    logits=logits,
    phrases=phrases,
)
annotate maps the normalized boxes onto the original image. If the source array has height h and width w, each box is multiplied by (w, h, w, h) and converted from (cx, cy, w, h) to corner format (x_min, y_min, x_max, y_max) with torchvision.ops.box_convert. The supervision library then draws a rectangle and a label of the form. The confidence in that label is the maximum token score, printed with two decimal places.
annotate converts RGB to BGR before drawing, because OpenCV stores images in BGR. The notebook converts the channels back before display:
from PIL import Image

annotated_frame = annotated_frame[..., ::-1]  # BGR to RGB
Image.fromarray(annotated_frame)
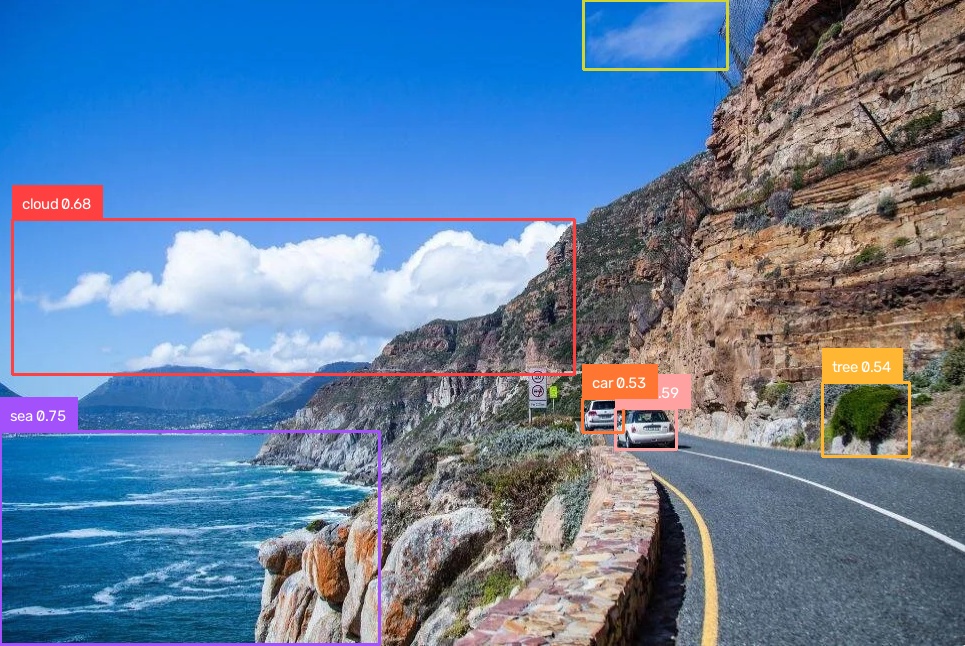
The slice ::-1 on the last axis swaps B and R. Image.fromarray then shows the annotated image in the notebook. To save the file from the same array, write the RGB image with PIL, or write the BGR array from annotate directly with cv2.imwrite.